
Friday 3 September 2021
2021 and Still making surfmats.
Sunday 12 July 2015
The basics of mat making.
It's not rocket science.
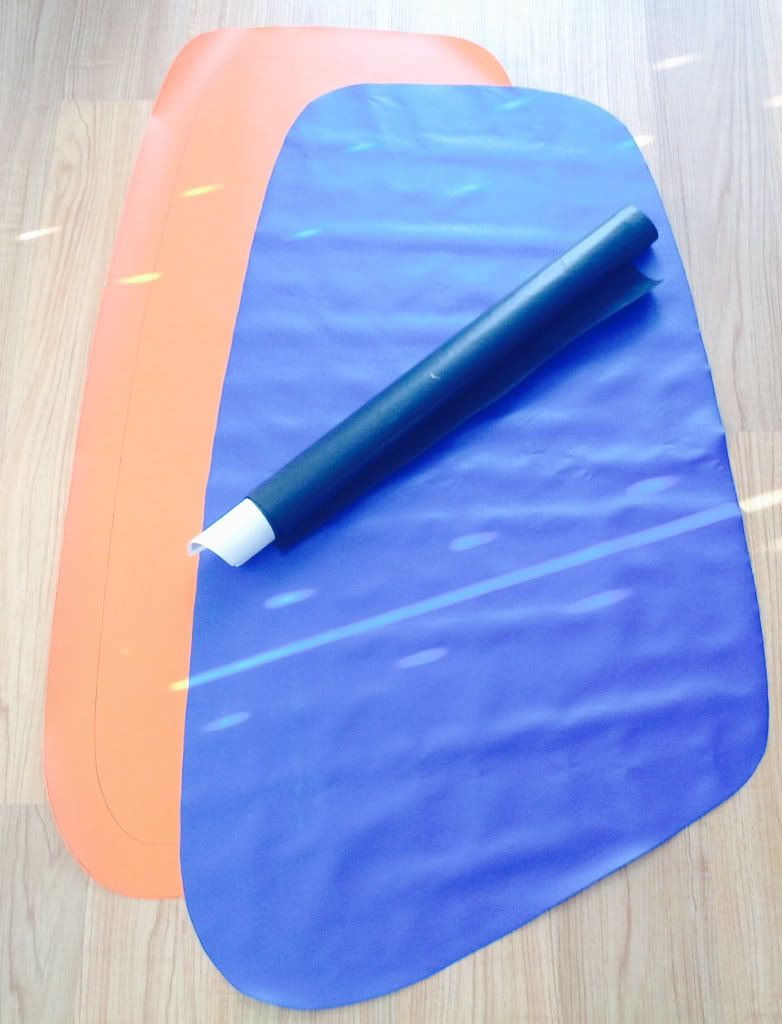
Here's a really easy way to make a mat.
You'll need a roll of vinyl or any sort of plasticised material, the essential thing is that the material you use is compatible with the glue you use.
This is the clear vinyl I bought, just google for it or keep your eyes open when you're driving around as there are lots of small places that sell or use vinyl.

It's clear weatherproof sheet. And the glue is a certain vinyl glue too. Made in the U.S. But once again Google for it.

And you'll need a cleaner to prep the material that you're glueing and that is easily available from any hardware store.

And then just a roller to smooth the joins together.

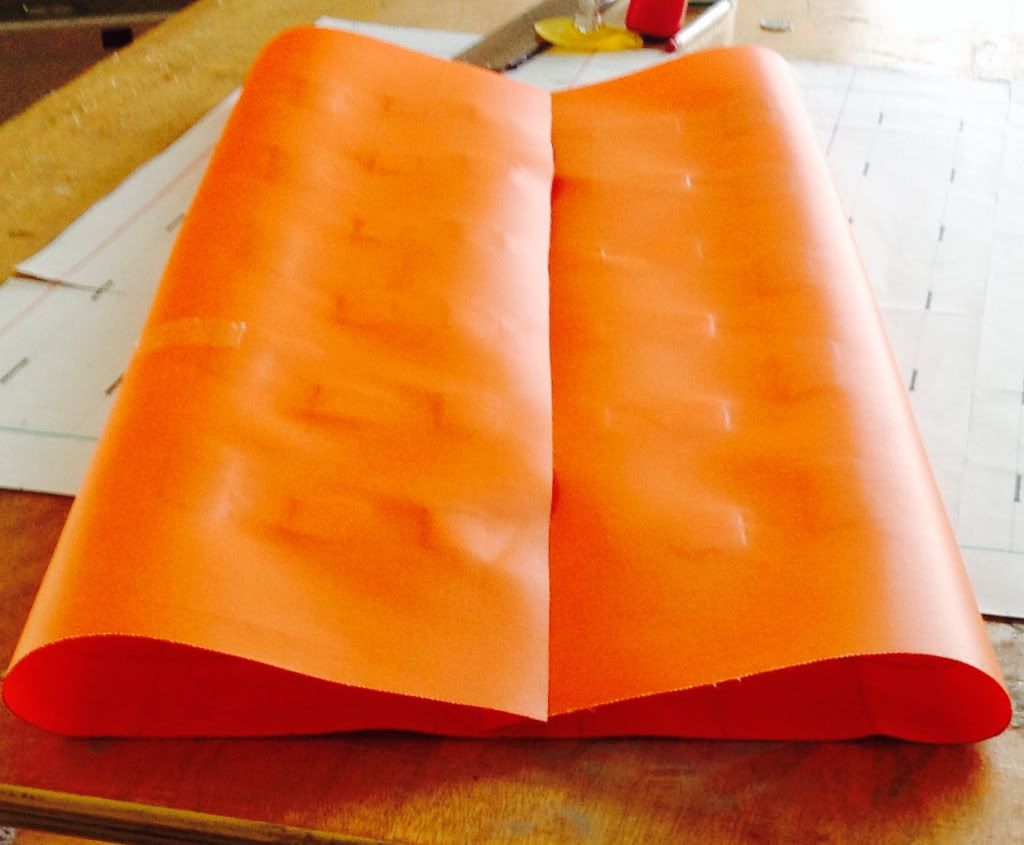
And that's all the hardware you'll need. Sure you could buy or build a heat welding system but vinyl glues are used around the world for plumbing so it's tried and tested, the glue basically melts both surfaces and joins them together as one piece. Even thin joins are permanent and the material is going to fail before the join.
Now all you have to do is come up with a design to build....
Thursday 9 July 2015
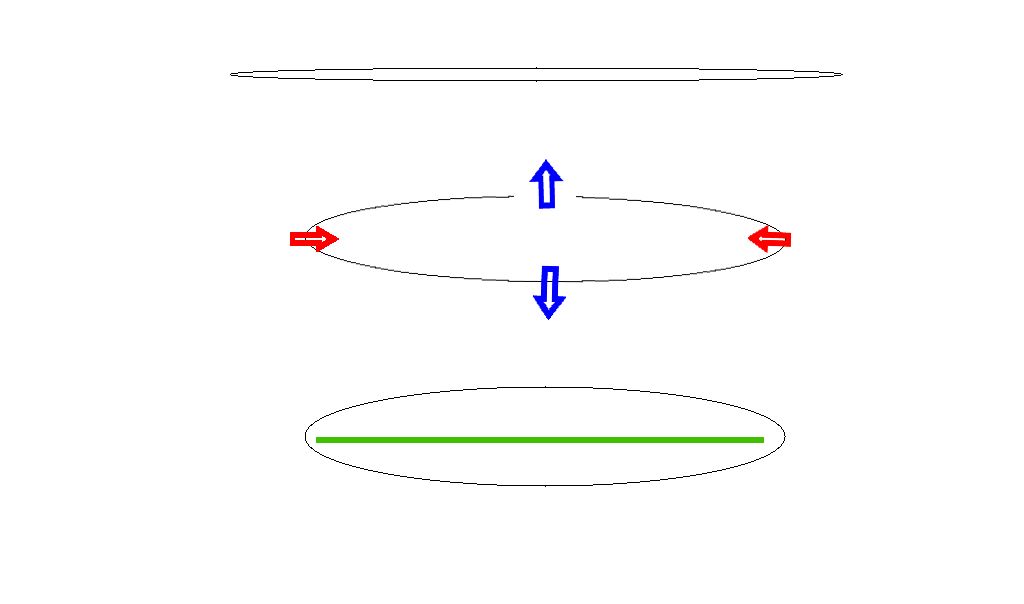
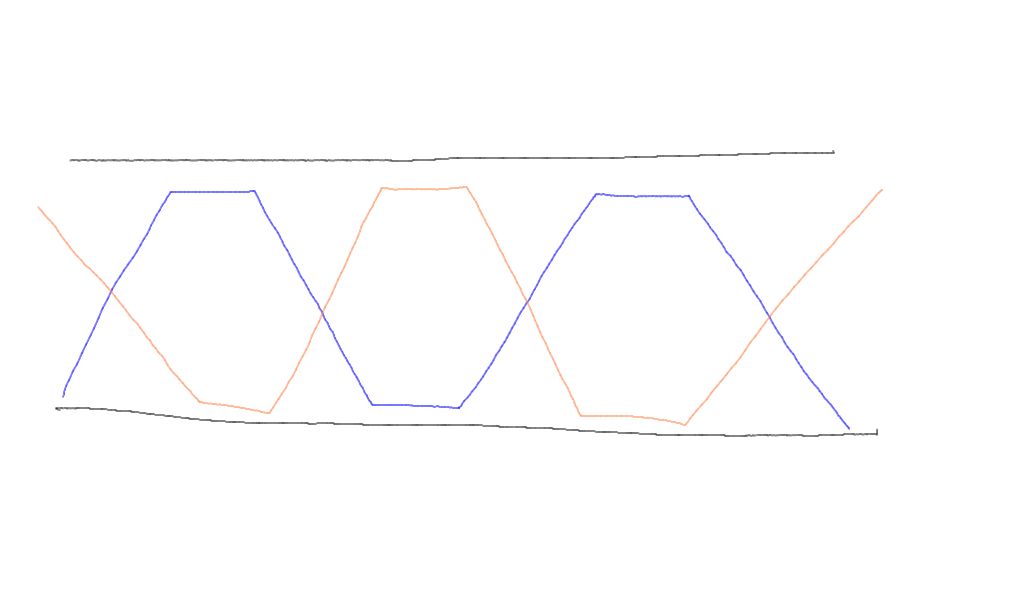
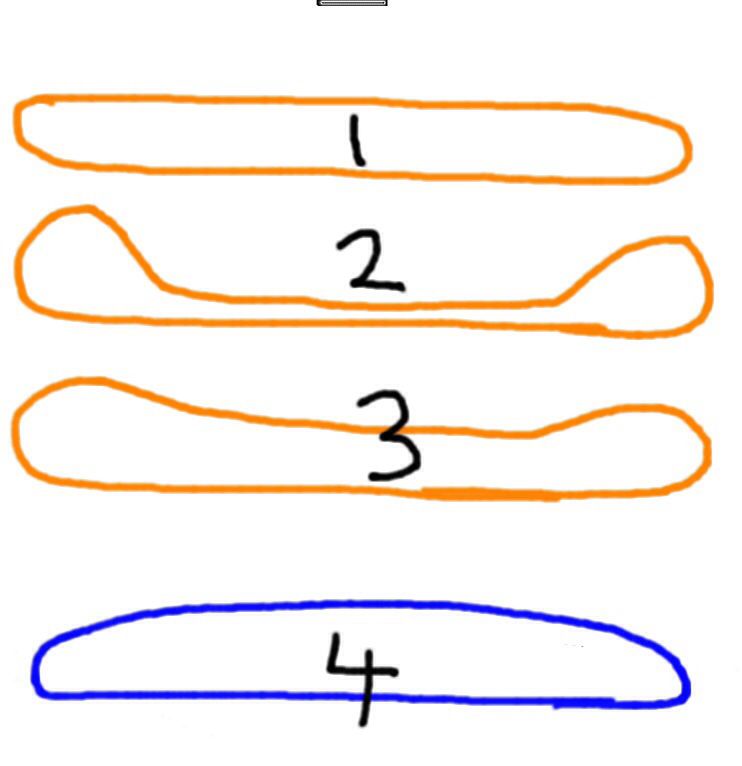
As a mat is inflated the deck and hull pieces become separated, as they separate the sides come in, quite dramatically in fact, some Mats can shrink by 5 inches.
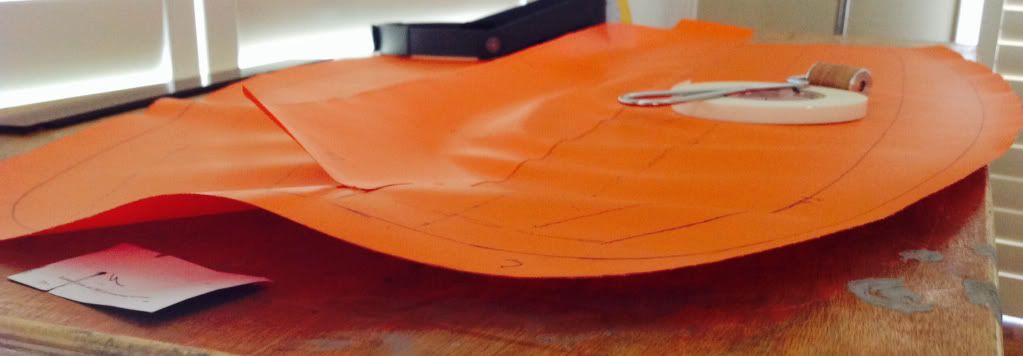
I want my mats to be the shape I want them to be, its all about getting it right, the right shape, the right volume, rather than leaving design to random chance.
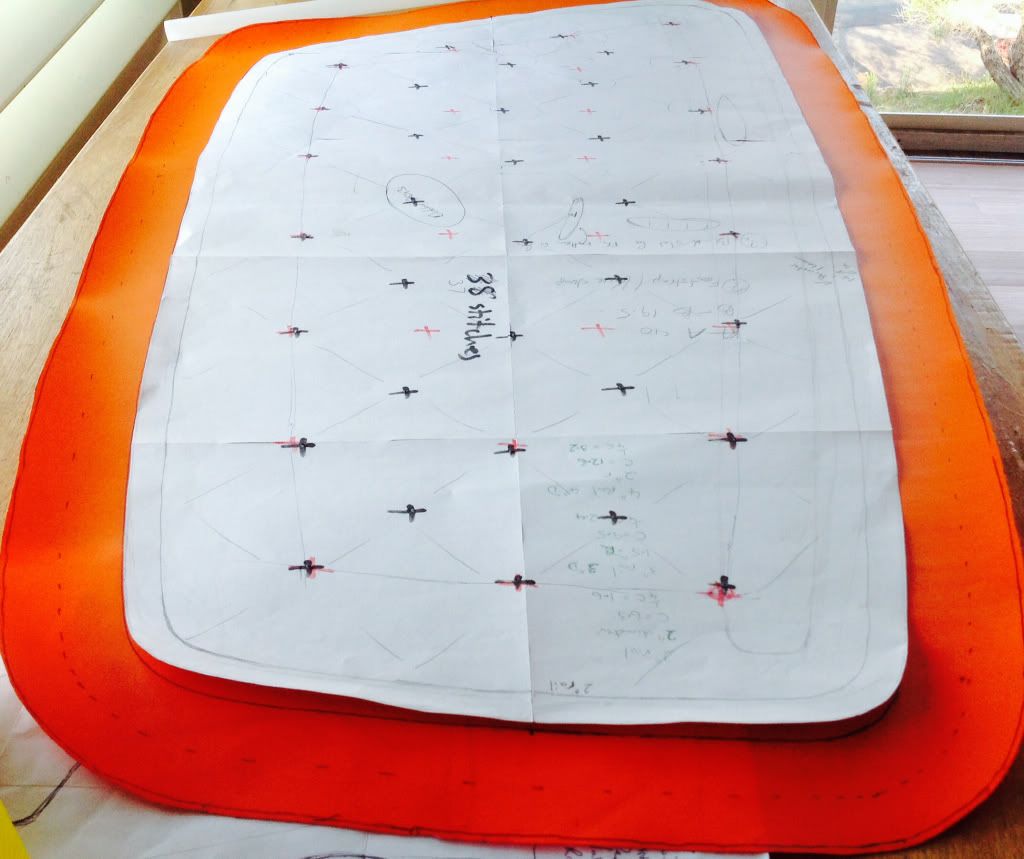
So starting with the right shape, factor in the number of pontoons, the curvature of the pontoons, the height of the I beams and the stretch of the fabric you get the original shape which is the intended shape of the inflated mat and the new larger outline for the uninflated mat.


I want my mats to be the shape I want them to be, its all about getting it right, the right shape, the right volume, rather than leaving design to random chance.
So starting with the right shape, factor in the number of pontoons, the curvature of the pontoons, the height of the I beams and the stretch of the fabric you get the original shape which is the intended shape of the inflated mat and the new larger outline for the uninflated mat.

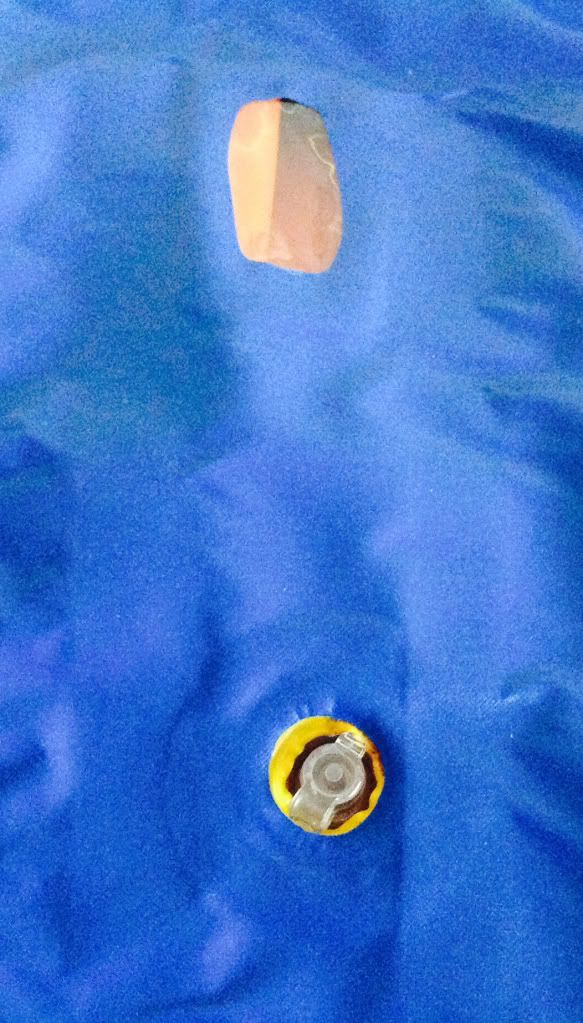
I'm going to do another completely clear vinyl mat so the valve is glued into a clear piece that acts as reinforcement.

Tuesday 7 July 2015
Chemical glue Vs Heat welding.
Two years later and I'm still making mats. I don't know how far the Invisible Mats have travelled but a few people have ridden them and not returned them so someone likes them.
I've always preferred glueing mats to heat welding, with the glues you can do any curves you like whereas the heat welding requires a metal frame so it's a bit limiting in design.
But I always wondered if glueing would last... Well wonder no longer !!
Glueing takes a bit of time, you have to prep the surfaces with a cleaner and then apply the glue and hold in place for a minute. But I wanted to see how long it would last so here's 7 different materials I glued onto a plastic sheet and have left outside nailed to a post for the past 2 and a half years.

Nothing's changed from the day I glued them on, the connection on each sample is completely secure and the only change would be that the excess glue has coloured a bit. That's a pretty solid result across a range of fabrics.

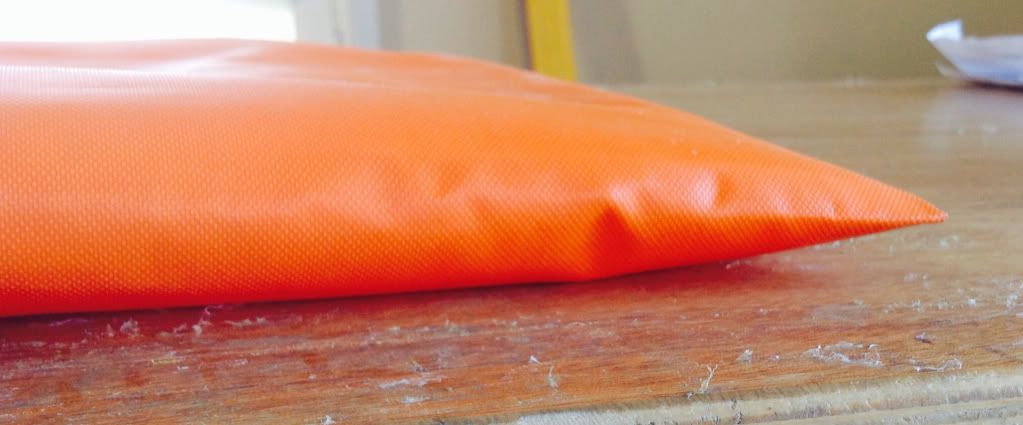
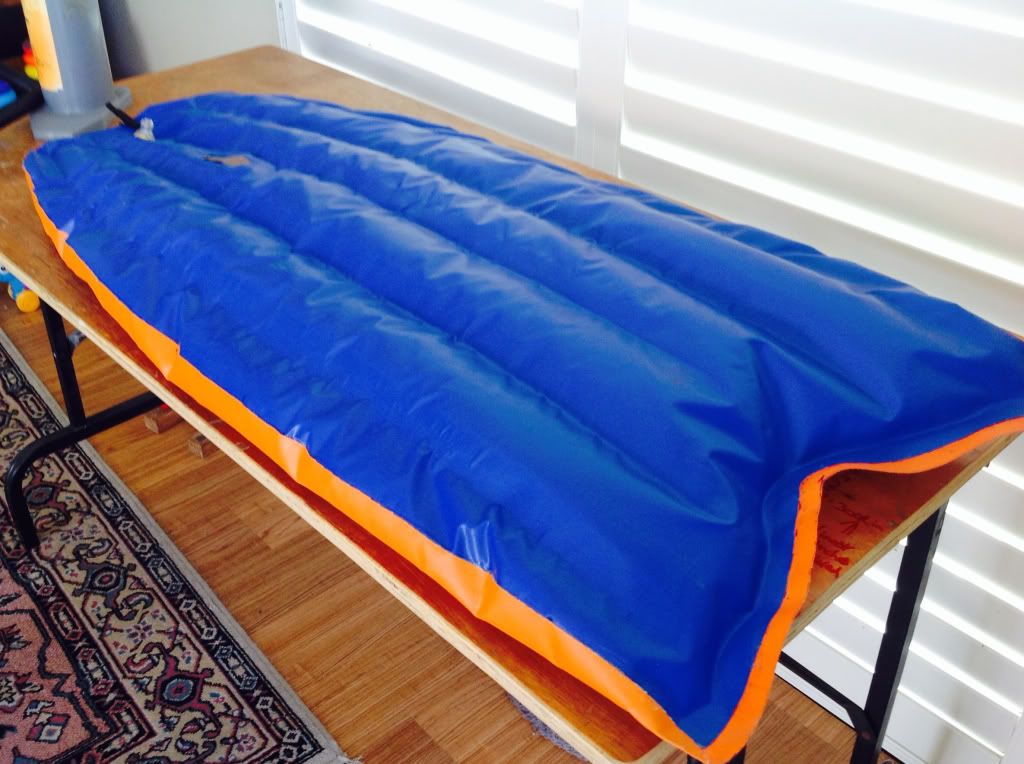
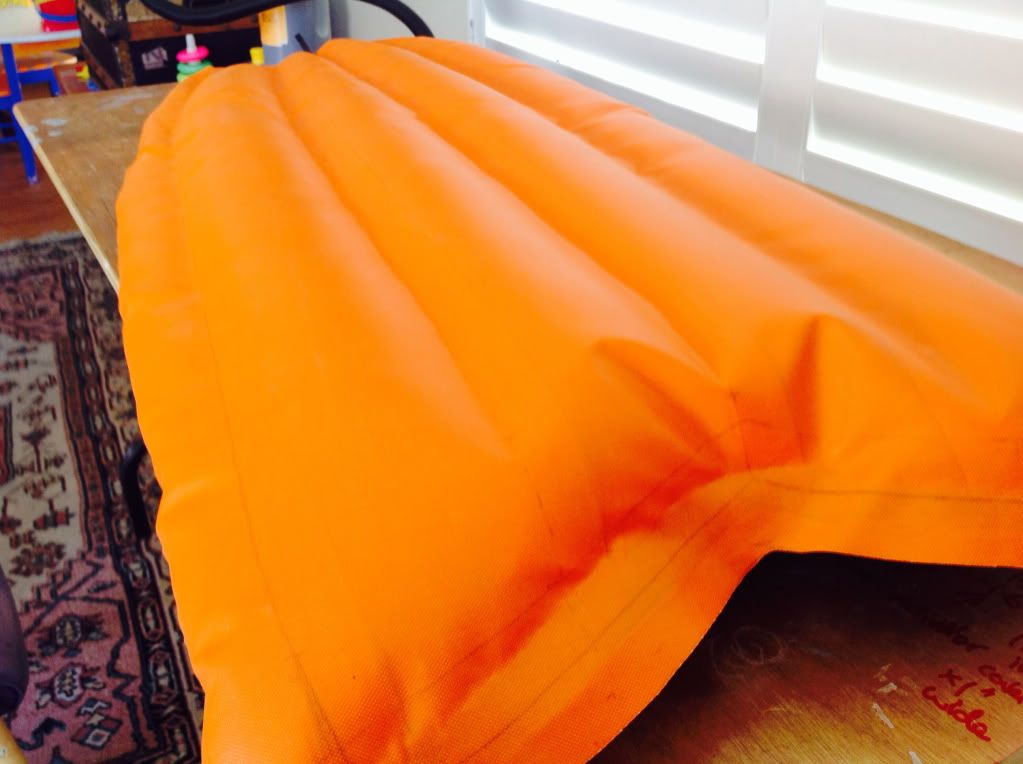
The next mat is going to be The Pestle. A little narrower in the front to reduce the buoyancy to help getting into waves and a curved outline in the back for a bit of wall grip when it gets steep.

And a few other changes outside the rectangle.
Thursday 28 November 2013
Inside or outside design.
It's just how my brain works, inspiration comes at times you least expect it and so when I was at the local Aquarium I thought about how a fish has a soft exterior built around a skeleton and I thought it could add another riding dimension by putting a component inside a mat.
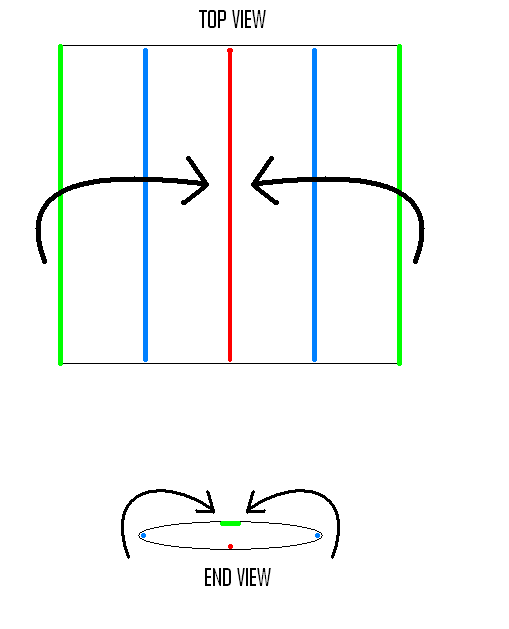
 As the mat inflates the sides are drawn in between 5% to 20% of the original length/ width and a flexible frame inside would be held by the forces of inflation. Of course the thicker the mat inflates the greater the reduction in width so each mat design would have its own frame shape and size.
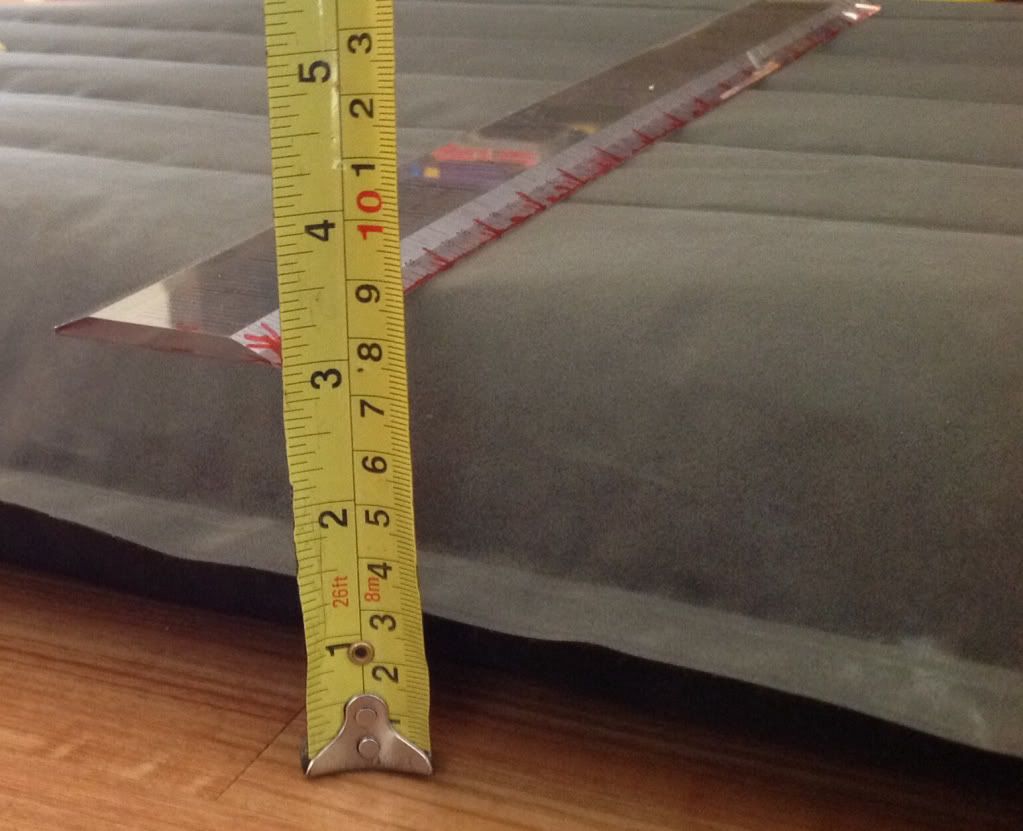
Fr'instance, a flat, empty mat 111cms X 61cm loses 5% of its length and 10% of its width at a 90 degree inflation it's also 3.75 in thick.
And at full inflation the mat is now 5 inches thick, loses no more length, but loses 20% of its original width.
As the mat inflates the sides are drawn in between 5% to 20% of the original length/ width and a flexible frame inside would be held by the forces of inflation. Of course the thicker the mat inflates the greater the reduction in width so each mat design would have its own frame shape and size.
Fr'instance, a flat, empty mat 111cms X 61cm loses 5% of its length and 10% of its width at a 90 degree inflation it's also 3.75 in thick.
And at full inflation the mat is now 5 inches thick, loses no more length, but loses 20% of its original width.
 As the mat inflates the sides are drawn in between 5% to 20% of the original length/ width and a flexible frame inside would be held by the forces of inflation. Of course the thicker the mat inflates the greater the reduction in width so each mat design would have its own frame shape and size.
Fr'instance, a flat, empty mat 111cms X 61cm loses 5% of its length and 10% of its width at a 90 degree inflation it's also 3.75 in thick.
And at full inflation the mat is now 5 inches thick, loses no more length, but loses 20% of its original width.
As the mat inflates the sides are drawn in between 5% to 20% of the original length/ width and a flexible frame inside would be held by the forces of inflation. Of course the thicker the mat inflates the greater the reduction in width so each mat design would have its own frame shape and size.
Fr'instance, a flat, empty mat 111cms X 61cm loses 5% of its length and 10% of its width at a 90 degree inflation it's also 3.75 in thick.
And at full inflation the mat is now 5 inches thick, loses no more length, but loses 20% of its original width.
Wednesday 27 November 2013
Mini surf mat
A friend said he wanted to try a small surf mat so I whipped up a Tube Mat for him, its 15 in wide X 22 in long.
The Tube mat design is so much easier to build than the traditional two piece, deck and hull technique.
 There is just one piece of material that forms the hull and the extra wide sides fold over and join on top to create the deck with just one straight weld or glue line. Using the Tube Mat concept eliminates the flaps around the perimeter of the mat and when you seal the ends you can choose to add a flap or not.
 If you do the two piece technique both sides have to align perfectly and when joined need to be connected without any stretch or inaccuracies. Makes me value the skills of the mat guys who still build them by hand !
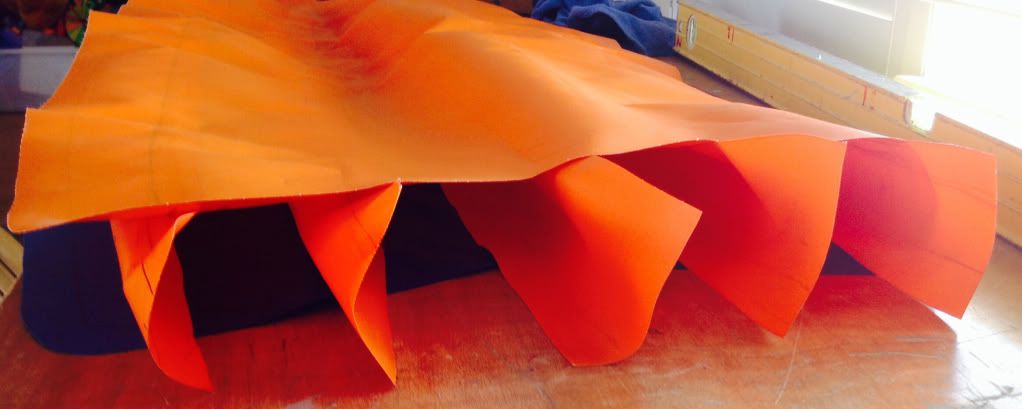
 Instead of a series of longitudinal I-beams Ive connected the deck and hull with vertical posts only an inch wide, the posts reduce the amount of material used inside the mat and so reduces the weight as well. It also creates a flatter mat when inflated because there are no valleys between the pontoons.
 Ive been able to take advantage of the 'post design' by designing a completely contoured shape where the front and back edge of the mat is tapered into a sliver and the rails are a different thickness to the middle of the mat. That's real customisation, a lot of work to initially figure out how to do it, but it would be easier next time round.
 I was going to give the Mini Mat a test ride but the surf was crap yesterday so I posted it off. Hopefully I'll hear how it goes.
 There is just one piece of material that forms the hull and the extra wide sides fold over and join on top to create the deck with just one straight weld or glue line. Using the Tube Mat concept eliminates the flaps around the perimeter of the mat and when you seal the ends you can choose to add a flap or not.
 If you do the two piece technique both sides have to align perfectly and when joined need to be connected without any stretch or inaccuracies. Makes me value the skills of the mat guys who still build them by hand !
 Instead of a series of longitudinal I-beams Ive connected the deck and hull with vertical posts only an inch wide, the posts reduce the amount of material used inside the mat and so reduces the weight as well. It also creates a flatter mat when inflated because there are no valleys between the pontoons.
 Ive been able to take advantage of the 'post design' by designing a completely contoured shape where the front and back edge of the mat is tapered into a sliver and the rails are a different thickness to the middle of the mat. That's real customisation, a lot of work to initially figure out how to do it, but it would be easier next time round.
 I was going to give the Mini Mat a test ride but the surf was crap yesterday so I posted it off. Hopefully I'll hear how it goes.


Friday 8 November 2013
Swallow Tail Surf Mat.
Learning a lot from looking outside the rectangle...
 Built in touch of nose rocker.
 I even added a clear window to look for innovation from within the mat.
 Construction is basically using 'seam-seal' tape that's used to build yacht sails and rolling the join flat.
 Half-deflated and the rails are built by overlapping the top and bottom rather than flat welding that leaves a perimeter flap.
 I always forget to take pics when a mats finished and this ones being ridden daily. Ive learnt that new techniques bring new performance and there's a lot more to discover about speed and controlled manouver ability.
 Built in touch of nose rocker.
 I even added a clear window to look for innovation from within the mat.
 Construction is basically using 'seam-seal' tape that's used to build yacht sails and rolling the join flat.
 Half-deflated and the rails are built by overlapping the top and bottom rather than flat welding that leaves a perimeter flap.

 I always forget to take pics when a mats finished and this ones being ridden daily. Ive learnt that new techniques bring new performance and there's a lot more to discover about speed and controlled manouver ability.
Tuesday 5 November 2013
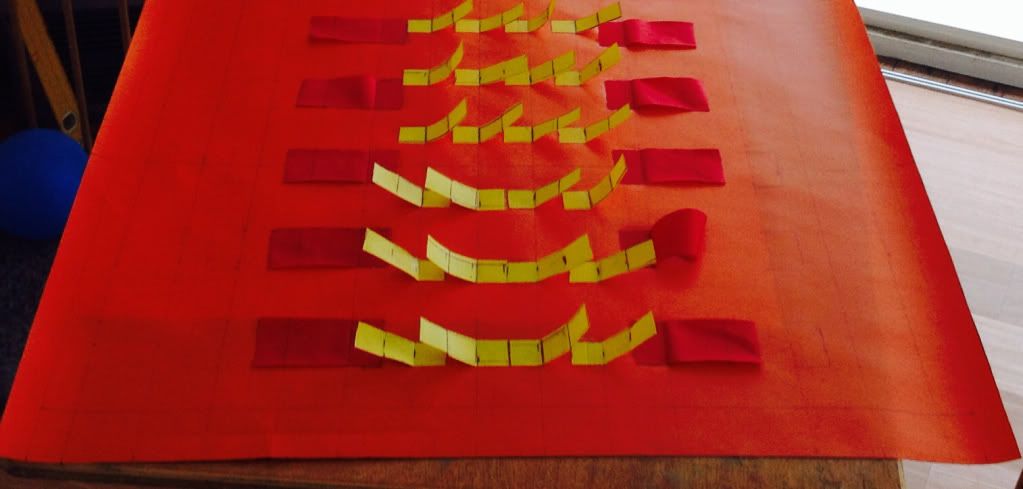
The simplicity of mat making.
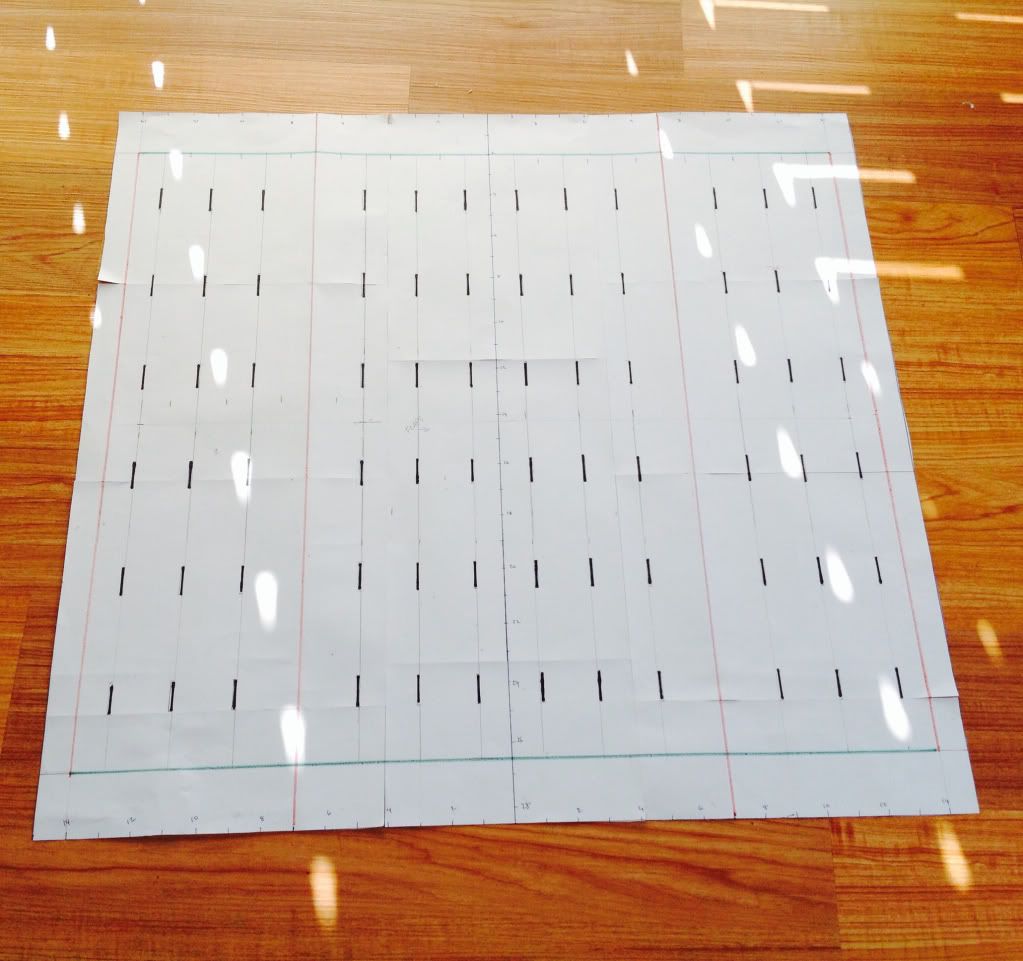
Mats can be very technical to build, and the wilder the design the more accurate the planning, measurements and construction techniques need to be.
So in the construction of a mat there's always a top piece and the underside piece of material, but what's with all those I beams ? On paper it all looks simple enough but when you get down to getting all the parts exactly positioned, it can become a very intricate 3-D creation.
So how simple can a mat be ? Sure you could just get a garbage bag and give it a go, but how simply could you build a reasonable mat with the fewest parts...
If you accept the essential of a hull piece, (and maybe it's not actually essential) then well start there.
This ones ribbed for your enjoyment.
 A flat piece with the pontoons evident for illustration purposes.
Add a Second piece, maybe as the deck. And weld / glue the two together to form 6 pontoons.
A flat piece with the pontoons evident for illustration purposes.
Add a Second piece, maybe as the deck. And weld / glue the two together to form 6 pontoons.
 Now add a third piece over the top creating another level of pontoons. So the 3rd piece becomes the deck and the 2nd piece is in the middle.
 And inflate.
 Now the 2nd piece in the middle creates a series of triangular pontoons, which as a stand alone concept opens up questions about how the shape of the pontoons concentrates the vertical energy transfer between the wave / mat / surfer and back again.
There's only 3 pieces to connect and its a simpler build and a more stable platform with angled beams.
I'd make one today but it will have to wait until I come back from holidays in the UK.
Now the 2nd piece in the middle creates a series of triangular pontoons, which as a stand alone concept opens up questions about how the shape of the pontoons concentrates the vertical energy transfer between the wave / mat / surfer and back again.
There's only 3 pieces to connect and its a simpler build and a more stable platform with angled beams.
I'd make one today but it will have to wait until I come back from holidays in the UK.
 A flat piece with the pontoons evident for illustration purposes.
Add a Second piece, maybe as the deck. And weld / glue the two together to form 6 pontoons.
A flat piece with the pontoons evident for illustration purposes.
Add a Second piece, maybe as the deck. And weld / glue the two together to form 6 pontoons.
 Now add a third piece over the top creating another level of pontoons. So the 3rd piece becomes the deck and the 2nd piece is in the middle.

 And inflate.
 Now the 2nd piece in the middle creates a series of triangular pontoons, which as a stand alone concept opens up questions about how the shape of the pontoons concentrates the vertical energy transfer between the wave / mat / surfer and back again.
There's only 3 pieces to connect and its a simpler build and a more stable platform with angled beams.
I'd make one today but it will have to wait until I come back from holidays in the UK.
Now the 2nd piece in the middle creates a series of triangular pontoons, which as a stand alone concept opens up questions about how the shape of the pontoons concentrates the vertical energy transfer between the wave / mat / surfer and back again.
There's only 3 pieces to connect and its a simpler build and a more stable platform with angled beams.
I'd make one today but it will have to wait until I come back from holidays in the UK.
Friday 1 November 2013
New Concept Surfmat -Asymmetrical.
I love asymmetrical surfboards and surfmats, they're not a generalised shape that works for left and right waves but specifically crafted for one direction of wave and sometimes even a specific wave break.
So I'm doing an asym-mat with my usual variations...
Pinched inside rail, reversible for lefts or rights, massive valve for instant deflation, blind sleeve with glassed batten, knee loop and instead of I-beams, a new technique of internal structure using fine nylon filaments called Tensairity.
Apart from the new ideas the mats fairly standard.
 The Tensairity filaments are planned out in a cross hatch pattern so there's no grooves from the straight I beams or propensity for the mat to fold in any direction.
 The pattern connects the deck and hull from top to bottom, from side to side and creates a flatter surface under the mat with less drag and gives a greater overall rigidity to the mat without increasing the internal pressure or volume, with Tensairity its possible to ride a mat that holds its overall shape but skims on a sliver of air.
 The Tensairity filaments are planned out in a cross hatch pattern so there's no grooves from the straight I beams or propensity for the mat to fold in any direction.

 The pattern connects the deck and hull from top to bottom, from side to side and creates a flatter surface under the mat with less drag and gives a greater overall rigidity to the mat without increasing the internal pressure or volume, with Tensairity its possible to ride a mat that holds its overall shape but skims on a sliver of air.
Sunday 20 October 2013
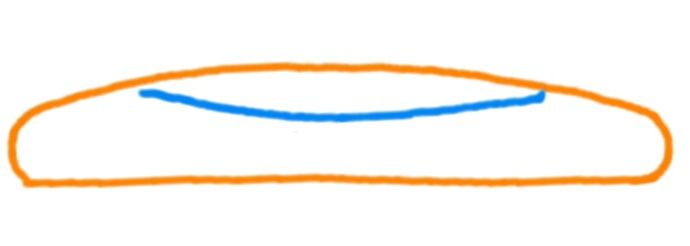
Flat mats Vs Domed Decks,
I did a post a few months ago about how the pressure changes when you get on a mat, it starts out with low pressure inside a set volume but when you're on the mat the pressure increases and inflates the parts you're not lying on. This side inflation often makes it look like the mat is fully inflated but it's just the rails that have filled out.
Initially a "90 degree" mat is 3 inches thick
 And when youre on the mat the rails inflate and you settle into the middle of the mat, but that's why it's so important to spread your weight out so that you keep a constant layer of air between you and the water.
 Mat rails are about 5 inches thick when inflated, and the bigger the rail, the flatter the curve and the less hold it has on the wave, a bigger rail also holds more volume of air and that resists dojng anything more than skimming the surface. You could design a mat with a concave but how are you going to force that inflated rail under water?
However having a slightly smaller rail with a more efficient curve will give more hold on steep waves and during turns. Add a domed deck and you've now got a mat that adds an extra inch between you and the water.
Mat rails are about 5 inches thick when inflated, and the bigger the rail, the flatter the curve and the less hold it has on the wave, a bigger rail also holds more volume of air and that resists dojng anything more than skimming the surface. You could design a mat with a concave but how are you going to force that inflated rail under water?
However having a slightly smaller rail with a more efficient curve will give more hold on steep waves and during turns. Add a domed deck and you've now got a mat that adds an extra inch between you and the water.
 These new features are going into the next mat called...The Torpedo !
 The Torpedo has a pulled in nose area to keep the control directly under your chest, you won't feel the need to put your arms forward. With your chin on the front edge, the Wide Point is in line with your hips for control and the Swallow tail is a great new feature Ive tried on the 2 previous mats and its an instant celebrity that's going on every future mat of mine from new on. The swallow tail doesn't affect the speed but it reduces the tail bouyancy so you control your turns with your inside leg. Freakin amazing !
Subscribe to:
Posts (Atom)